

how to add tomcat server in eclipse
In this tutorial, I will teach you how to add a tomcat server in Eclipse IDE and other functionality that you would require to develop a web application. It is assumed that you have preliminary knowledge of using eclipse, If not please visit this link.
Now you have installed Eclipse so the next thing would be to start using Tomcat from inside eclipse.
Steps are
- What is Tomcat
- Download Tomcat
- Add Tomcat in eclipse
- Add a project in tomcat
- Run web application in tomcat from eclipse
What is Tomcat
Apache Tomcat (Commonly known as Tomcat) is an open-source web server and servlet container developed by the Apache Software Foundation (ASF). Tomcat implements the Java Servlet and the JavaServer Pages (JSP) specifications from Oracle Corporation (Previously known as Sun Microsystems).
Download Tomcat
To download the current version (7.0.34) of Tomcat please visit here. There are different download links available on this page(32bit/64bit/zip format/tar format..). Select one which is most suitable for you. If you don't want to go into detail, download the tomcat from the first download link in ZIP format. Once downloaded, extract the folder in the local file system (Assuming extracted file location is "d:/tomcat"). After extraction, the file structure would look like below.
Add Tomcat to Eclipse
It's time to open Eclipse. Once opened open server view (To know more about views click here)
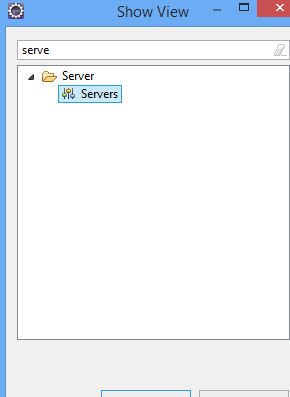
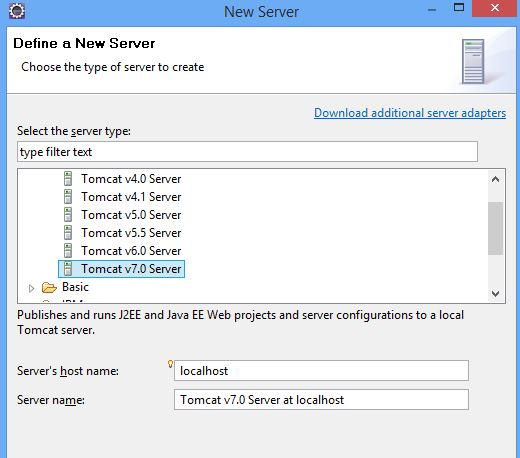
Currently, there is no server available. You need to add a new one. Click the link " New Server Wizard ". It will show the popup window. Select the proper tomcat version. In the current situation select " Tomcat v7.0 Server " and click "Next".
 In the Next window browse the folder where you have extracted the tomcat folder just downloaded. Or you can choose the option to Download and Install option available in this window.

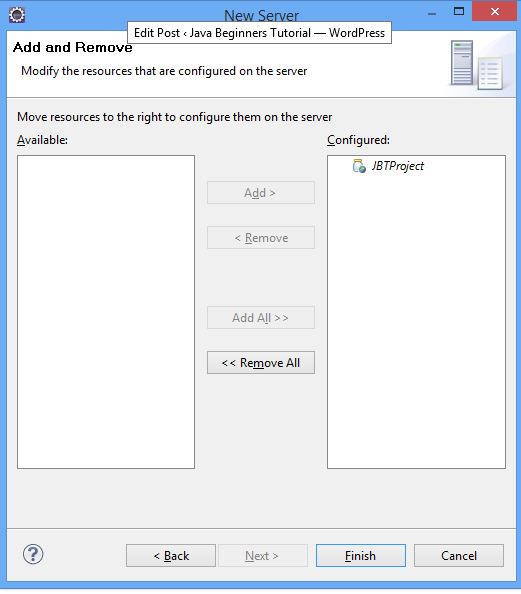
Now click Next. If you have any web project which you want to add to the tomcat server you can do that here on the next screen. If there is any web application in the given workspace then it will get displayed on the left side as below. If you want to add a web application in tomcat select the application and click the Add button. It will be added to the given tomcat instance. Once done with it, click Finish.
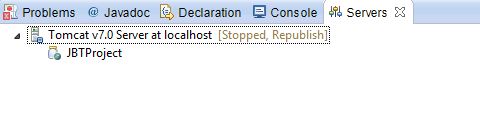
If everything is fine server view will now have a instance of Tomcat server with JBT application added in it.
 Add Project in Eclipse
What if you have already created an instance of the tomcat in Eclipse and now you want to add a newly created web application to the existing Tomcat server.
To add a newly created web application, select the tomcat instance in which you want to add a web application, right-click and click the " Add and Remove.. " menu.
It will open the Add and Remove window. Select the web application which you want to deploy and click Add>.
After adding the application click Finish. Now the server will have two web application in it which can be configured in server view.
Run & Debug web application in tomcat from Eclipse
Now we are done with adding the web application to the server it's time to run the application. To run tomcat select tomcat right click and then select "Start" (To start the server in run mode) or "Debug" (To start the server in debug mode) menu. It will start the server in the given mode and you can check the output in the console view.
how to add tomcat server in eclipse
Source: https://javabeginnerstutorial.com/eclipse-2/add-tomcat-server-to-eclipse/
Posted by: andrewishoune.blogspot.com
0 Response to "how to add tomcat server in eclipse"
Post a Comment