

How To Add Vpn To Control Center Iphone
![]()
2021, October 4 · 10 min read

Love your iPhone and iPad? We do too. That's why we're here to help you protect them!
If you're tired of being tracked and feeling unsafe online, a VPN is a great tool to improve your digital life . It will protect your internet traffic and mask the IP address on your iOS devices. Setting up a VPN on iOS is simple – you can install a VPN app like Surfshark or configure your VPN settings manually.
How? Apple has built-in IKEv2 and L2TP/IPSec VPN configurations, but you can connect to any type of VPN (e.g., OpenVPN) via a third-party app. In a nutshell, here are the two ways to set up a VPN on your iPhone or iPad:
- Manually. You can set up an IKEv2 or L2TP/IPSec configuration by downloading one from your provider and going to your Settings > General > VPN > Add VPN configuration > Type.
- Simply download a VPN client. This way, a VPN will configure everything automatically.
I'll cover both of these approaches one by one in the step-by-step guides below.
What's the purpose of a manual VPN setup
Most of the time, downloading a pre-configured and ready-to-use VPN client is easier and better than a manual VPN setup. However, there might be a few reasons why you'd want to go for the manual setup:
- In countries like Russia or China, you'll most likely run into trouble trying to use a VPN app. Governments there use censorship to control as much of their citizens' lives as possible. That includes VPN usage. Manually setting up a VPN on your iOS device might help you bypass VPN bans in restrictive countries. It's not a guarantee, but it's worth a try.
- In any other case, when your VPN app stops working, a manually configured VPN could "substitute" it.
Simply put, a manual VPN setup is like your last option when nothing else works.
Now, I'll walk you through the step-by-step instructions on how to set up IKEv2 and OpenVPN on iOS. I'm not going to cover the L2TP connection because this protocol is outdated and not secure. Learn more about VPN protocols on our website.
Note: The configuration may slightly vary depending on your chosen VPN provider, but the principle remains the same.
How to manually set up a VPN on iOS (IKEv2 connection)
As I already mentioned, iPhones and iPads come with built-in IKEv2 configurations. Thus, you won't need any third-party apps. What you'll need, though, is an IKEv2 certificate and connection credentials. You can get them from your VPN provider's website.
To manually set up a VPN on your iPhone or iPad with IKEv2 connection, follow these steps:
- Download the IKEv2 certificate to your device. As mentioned above, you will find it on your VPN provider's website after you log in (e.g., https://my.surfshark.com/auth/login ). In this case, go to VPN tab > Manual Setup > Manual, and go to the locations tab. Then scroll down to Other configuration files, and click on the IKEv2 certificate.

- Find your manual connection credentials in the Credential tab under Manual setup (you'll need them later) . Note: The username and password given here are separate from the ones you use to log into your account.

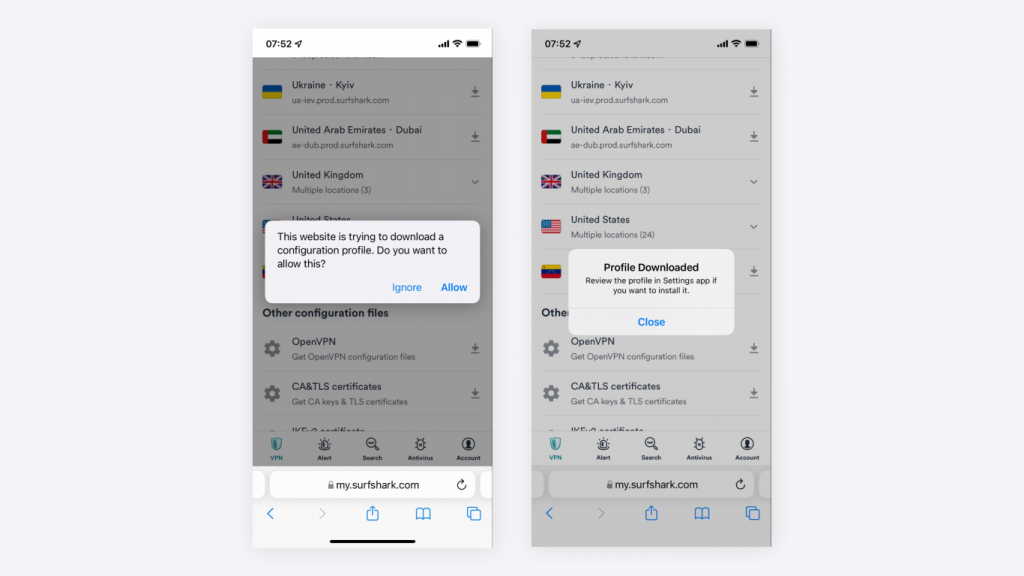
- Go to Settings on your iPhone or iPad. At the very top, you'll see Profile Downloaded. Click on it.
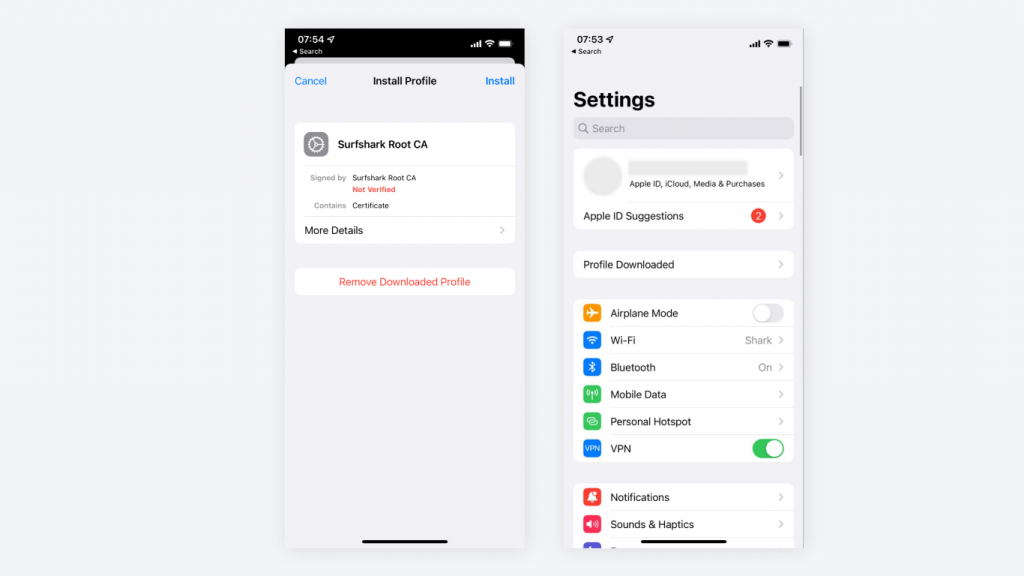
- Install the profile.

- You'll get a Warning screen about adding the certificate on your iPhone/iPad. Click Install once again .
- When the profile is installed and you see the green Verified checkmark, click Done to finish.
Note: If you don't get a pop-up for the IKEv2 certificate installation, refer to the solution below these steps. - To connect to a server, choose one from the list of your VPN provider's server hostnames under the Locations tab . For the best connection speed and performance, choose the Recommended server. For example, if you pick a server in Belgium, you'll have to enter "be-bru.prod.surfshark.com."

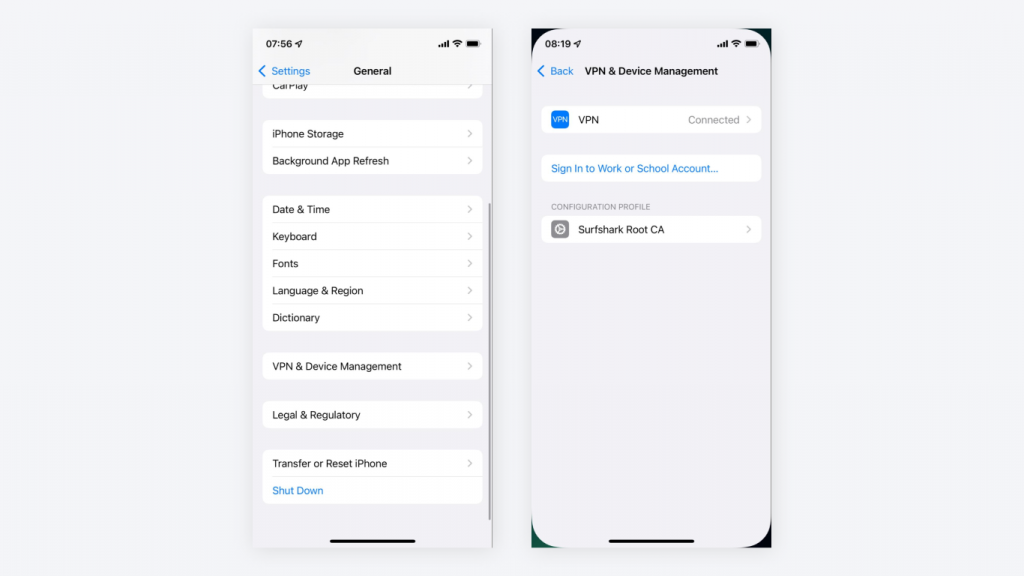
- Go to Settings > General > VPN & Device Management > Click on the VPN tab.
- Click on Add VPN Configuration…
- Fill in the following information:

Type: IKEv2
Description: Your preferred name of the connection
Server: The hostname of the server, as mentioned in step 7
Remote ID: Copy the hostname you put in the Server line
Local ID: Leave it empty
User Authentication: Username
Username: Put in the service credentials, as mentioned in step 2
Password: Put in the service credentials, as mentioned in step 2
Proxy: Off
- Click Done to finish.
- Go to Settings > General > VPN ; the IKEv2 configuration you just created will be here. Toggle the Status switch on.
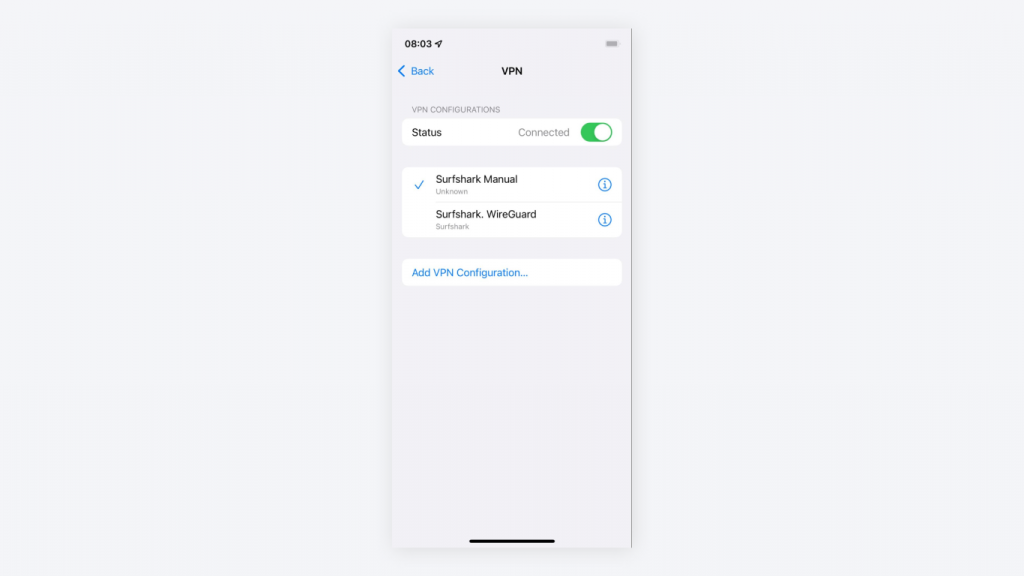
- You're now connected.
In case you didn't get a pop-up for the IKEv2 certificate installation:
- Go to Settings > General > Profile .
- You should see the downloaded profile, e.g., " Surfshark Root CA ."

- Click on it and select Install .
Download a VPN client on your iPhone or iPad
Downloading a VPN app straight to your iOS device is as simple as installing any other app. The process with a VPN app is as follows:
- Step 1: Go to the App Store ; or straight to the site's download page and skip to Step 3.
- Step 2: Search for a VPN of your choice, e.g., Surfshark .
- Step 3: Install the app. The app will ask you to give permission to add a VPN configuration. Allow it.
- Step 4: Create an account , or if you already have one, log in.
- Step 5: Connect to your preferred server .
Congratulations! You've just installed the app with all of its features. You can leave it at that if you're satisfied, but even the complete VPNs leave enough space for individual configuration.
Ways to personalize the VPN app you have on your iOS device:
(Side note: Some of the features below are exclusive to Surfshark. I'm using them as an example of feature variety.)
- Change the VPN protocol settings.
- Use the Auto-Connect feature.
- Turn the Kill Switch feature on/off.
- Turn the CleanWeb feature on/off.
- Use servers with static IP.
- Use the MultiHop feature.
As you can see, users can tinker with the VPN settings quite a lot. This is one of the biggest benefits of using a VPN app rather than a manual setup.
How to manually set up OpenVPN on iOS
Since the OpenVPN connection isn't built into the Apple mobile devices, you'll need to download a third-party app from the App Store. Follow the steps below to see the entire process.
What you'll need to do to set up an OpenVPN connection on your iOS device:
- Get your VPN provider's service credentials from their website. Log in (e.g., https://my.surfshark.com/auth/login ), go to Devices , scroll down to Manual , and then scroll down to the bottom of the page.
- You'll see the service credentials. Note: The given username and password are separate from the ones you use to log into your account.
- Open the App Store and search for "OpenVPN Connect."
- Download the app.
- When you install the app, download one or several OpenVPN configuration files from the manual connection page . Choose the Recommended server for the best performance and speed. Download the file by clicking on the grey arrow icon.

- Unzip the downloaded compressed configuration files.

- Open the OpenVPN Connect app.
- Click on OVPN Profile .

- Click Add to import the .ovpn file .
- Fill in the information:
Username: Put in the service credentials, as mentioned in step 1
Password: Put in the service credentials, as mentioned in step 1
Optional: Mark the password to be saved, so you don't have to worry.

- Click Add .
- Once you've added the profile, toggle the connection switch on .

You're now connected.
Keep in mind that our fantastic customer support team works 24/7. Contact them in case of any problems regarding configuration.
A VPN setup on iOS that's easy
The manual VPN configuration requires extra steps, but it can be useful for people in restrictive regions. It can also be used as the last option when a VPN app suddenly stops working.
However, pre-configured VPN apps offer a simple user interface – notice that the next time you open the Surfshark app on your iPhone or iPad. When you install a VPN client straight to your device, you have quick access to all server locations and features. It takes a couple of clicks to switch from one server to another.
Meanwhile, when you set up a VPN connection in a specific protocol, you can only connect to one server at a time. That's why I suggest you always opt for a VPN app rather than a manual configuration (unless you need to, of course).
Let tech experts do the work for you
Enjoy the ease of our VPN
Get Surfshark
![]()
Written by
Ieva Bulatovaitė
Bringing you closer to the cybersecurity world one word at a time
How To Add Vpn To Control Center Iphone
Source: https://surfshark.com/blog/how-to-setup-vpn-on-iphone
Posted by: andrewishoune.blogspot.com
0 Response to "How To Add Vpn To Control Center Iphone"
Post a Comment